

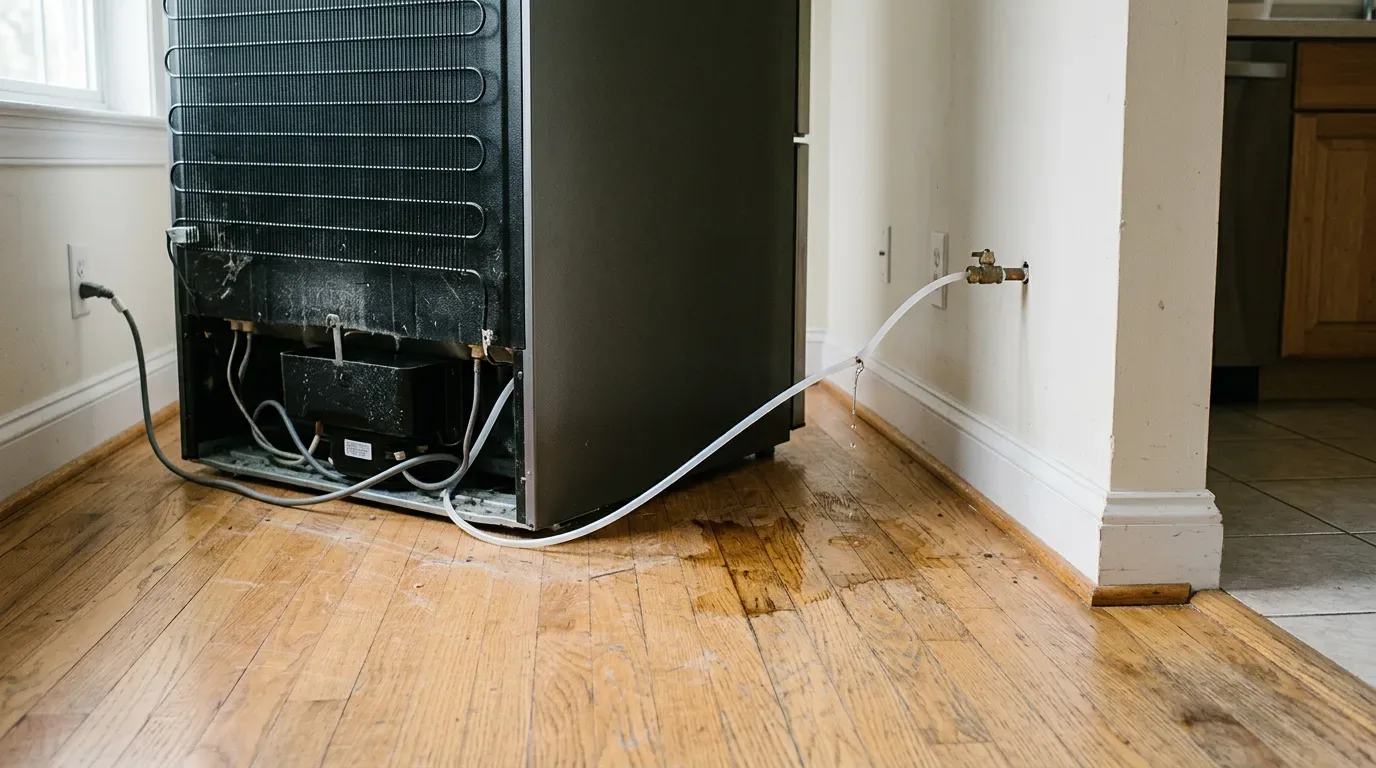
Found a puddle under the refrigerator and not sure what to do? The problem is common, and it can point to a minor fault or to a serious breakdown. A puddle under the fridge is always an unpleasant surprise. It can ruin the floor covering and even create a dangerous situation if there is wiring nearby.
There can be several reasons for the water, from ordinary condensation to a damaged supply line. In a refrigerator with an automatic ice maker, one of the main causes on the list is a damaged water line. An ice maker line leaking behind the fridge often goes unnoticed for a long time, because the water runs under the appliance, into the floor or along the wall, and not out into the kitchen. Below we go through where the line runs, how to tell it is leaking, how to check it, how it is connected again, and what to do with a floor that has already taken on water. If the water has already spread past the kitchen, our page on water damage restoration in Carlsbad explains the larger job.
Where the Ice Maker Line Runs
A refrigerator with a water supply needs access to the water line that will feed it. The ideal spot is next to the water pipe, where the hose can be installed easily, without extra bends or tension. Keep in mind that the hose should not be too long, to avoid pressure loss.
Usually the line starts at a tee or adapter on the cold water pipe, most often next to the sink or in the kitchen cabinet. From there it goes behind the fridge, sometimes through the floor or the wall, to the water inlet on the back of the refrigerator. Its parts are:
- The shutoff valve. A separate valve on the cold water pipe, for safety and easy servicing.
- The filter. It is best installed right before the connection to the refrigerator, between the water line and the supply hose, so foreign particles do not get into the system. Its location should make it easy to clean and replace the cartridges.
- The hose. It runs from the adapter on the pipe to the inlet on the back of the fridge.
- The connections. Fittings, adapters and seals on both ends and at the filter.
The placement itself should also protect against leaks. Position the refrigerator so it is easy to check the condition of the hoses and connections. There should be enough distance from the walls and other obstacles: the fridge needs air circulation, and nothing should be in the way of the water line connection.
Signs of a Refrigerator Water Line Leaking
Note where the puddle is: in front, behind or to the side of the refrigerator. This will help pin down the source more precisely. Some signs that help tell where the water comes from:
- The puddle keeps growing. This may point to a problem with the water line or a serious fault.
- The puddle appears periodically. The problem is likely in the defrost system or the drain system.
- Water collects only after the door is opened. The door gasket may be damaged.
- Water appears only in warm weather. This is probably condensation from high air humidity.
When the line leaks slowly into the floor, there may be no puddle at all. Then the damage shows itself on the floor covering: boards near the fridge rise at the seams, swell or go in a wave, and a musty smell appears. Stains on the ceiling or walls below the kitchen are another sign that the water has gone through the floor. A refrigerator water line leak under the floor, or a refrigerator water line leaking in the wall, keeps feeding moisture into the base and the cavities, and the smell of dampness there is a reason to think about mold; the page on mold remediation after hidden leaks covers that part.
A puddle under the fridge can create a dangerous situation if there is wiring nearby. Before you move the refrigerator or start looking for the leak, unplug it, and shut off the water to the ice maker line.
How to Find the Source of the Leak
To find out exactly where the water comes from, follow this method of ruling out the possible causes one by one.
Step 1: Prepare for the check
- Get the supplies. A flashlight, dry rags or paper towels.
- Move the fridge. Pull the refrigerator away from the wall to get to the back.
- Dry the area. Wipe up the puddle under the refrigerator.
- Lay paper towels. Put dry paper towels in the places where the leak might be (front, back, sides).
Step 2: Check outside factors
- Confirm the source. Make sure the puddle really comes from the refrigerator and not from nearby objects or leaks in the wall.
- Check the level. Use a level to check that the fridge stands evenly.
- Look around. Inspect the space around the refrigerator for condensation on pipes or walls.
Step 3: Check the water supply system
This step is for models with an ice maker or a dispenser.
- The connections. Inspect the joints of the water lines.
- The filter. Check the water filter, if there is one.
- The hookup. Make sure there are no leaks where the line connects to the water supply.
- The reservoir. Check the water tank for cracks.
Step 4: Watch where the puddle forms
After a careful check and wiping up the existing moisture, turn the refrigerator back on and watch where the water starts to collect. If it is in front, the problem is likely the door or the drain of the fresh food compartment. If it is behind, near the compressor, it may be the drain pan or condensation. Also note how often the puddle appears: all the time, after the door is opened, at a certain time of day, after a defrost cycle, or when the room is humid.
For a fridge leaking water on the floor, it is also worth looking at the EPA WaterSense guide to finding household leaks, which describes simple leak checks for the whole home.
Replacing the Line: Braided Hose and a Proper Valve
Connecting a refrigerator with a water supply without a plumber is a doable task if you follow simple rules. The main thing is to set up the water supply correctly to avoid problems with leaks. Do not use old or damaged hoses.
What you need
- Flexible supply hoses. One of the most important parts of the connection. The hoses must hold up to water pressure, last a long time and resist damage, which is why a braided line is used in place of a plain one. Choose hoses with the right diameter for your refrigerator and water line.
- Adapters and fittings. To connect the hoses to the plumbing, special adapters and fittings are often needed. Pick fittings that match the size of the water pipe and the outlet on the refrigerator.
- A shutoff valve. A separate valve on the line, so the water to the fridge can be shut off without shutting off the whole house.
- A water filter. It keeps the supply system from clogging and improves the quality of the ice and drinking water.
- Seals. Washers at all connections help prevent leaks that can damage surrounding surfaces and the refrigerator itself.
- Tools. A basic set: wrenches, screwdrivers and possibly a tubing cutter to trim the hoses. You may also need parts to secure the hoses and adapters so they do not come loose during use.
Connecting the water line
First, shut off the water and find the nearest cold water pipe. Using adapters, connect one end of the flexible hose to the water line. Do not forget to check the connections for tightness; use washers for this. After connecting the hose, attach the other end to the back of the refrigerator, where the water inlet is. Installing a filter is also recommended. It can go right after the connection point on the plumbing, before the water enters the refrigerator.
Checking for leaks
Once all the hoses are connected, turn on the water and carefully check the connections for leaks. If you find a leak somewhere, tighten the connection or replace the seal. This matters especially for protection against future leaks, which can lead to damage to the floor or other structures. Regular checks of the system and good materials will extend the life of the appliance.
Damage Under Cabinets and Floors
A copper ice maker line leaking or a split plastic hose usually leaves water in places that cannot be seen: under the base of the cabinets, under the flooring and under the underlayment. Laminate is a multilayer construction, with a high-density fiberboard at its base. It absorbs moisture and swells: the board grows in size, and the seams open up.
If the laminate swelled from water, act fast: in the first 24 to 48 hours the covering may still be saved.
Emergency steps without taking up the floor
- Wipe up the water. If water was spilled and you caught it in time, simply wipe the puddle dry with rags or a sponge.
- Clear the area. Remove rugs and move furniture away so the moisture can evaporate.
- Remove the baseboards. Take off the baseboards around the perimeter of the room: moisture evaporates faster through the gap between the laminate and the wall.
- Ventilate. Open the windows, turn on a fan and point the air along the floor. Do not dry it with a heat gun: this will make the deformation worse.
A good-quality board, after drying naturally (this can take several days), may return to its original shape.
Taking up the floor after a heavy leak
If the flooding was heavy, drying the floor from above is pointless: the moisture has collected under the underlayment. If you rent, tell your landlord first. Carefully remove the baseboards and take up the laminate from the wall to the damaged area. Wipe each panel dry, dry the subfloor completely and replace the underlayment, since the old one has most likely lost its properties.
When the flooring has to be replaced
Sometimes the board breaks down for good: the boards have swollen, delamination has started. Signs of serious problems:
- The board crunches. When pressed, it crunches instead of springing back.
- The gaps stay. The gaps between the panels do not close after drying.
- The surface changes. It has darkened or gone wavy across the whole area.
Sometimes part of the covering has to be replaced. If cabinets, appliances and belongings have to come out of the kitchen for the drying and the repair, see how pack-out and contents storage works.
Drying and Prevention
Trouble can be prevented. Before installing flooring, make sure the subfloor is dry and level. Use good waterproofing and underlayment. In rooms with higher humidity (kitchen, bathroom), put down moisture-resistant laminate. If water is spilled, wipe the floor dry right away. Keep the air humidity in the room at 45-60%.
On the refrigerator side, the same rule applies as for any water connection: place the fridge so the hoses and connections are easy to check, and check them regularly. A shop or office kitchen with an ice maker has the same weak point; there is a separate article on keeping a business open during restoration. More articles on leaks and drying are collected in our water damage blog.
If the leak has gone under the cabinets or through the floor and you do not know how far the water spread, you can read who we are and how we work, look at what Carlsbad homeowners say, or start from the Carlsbad restoration home page.