

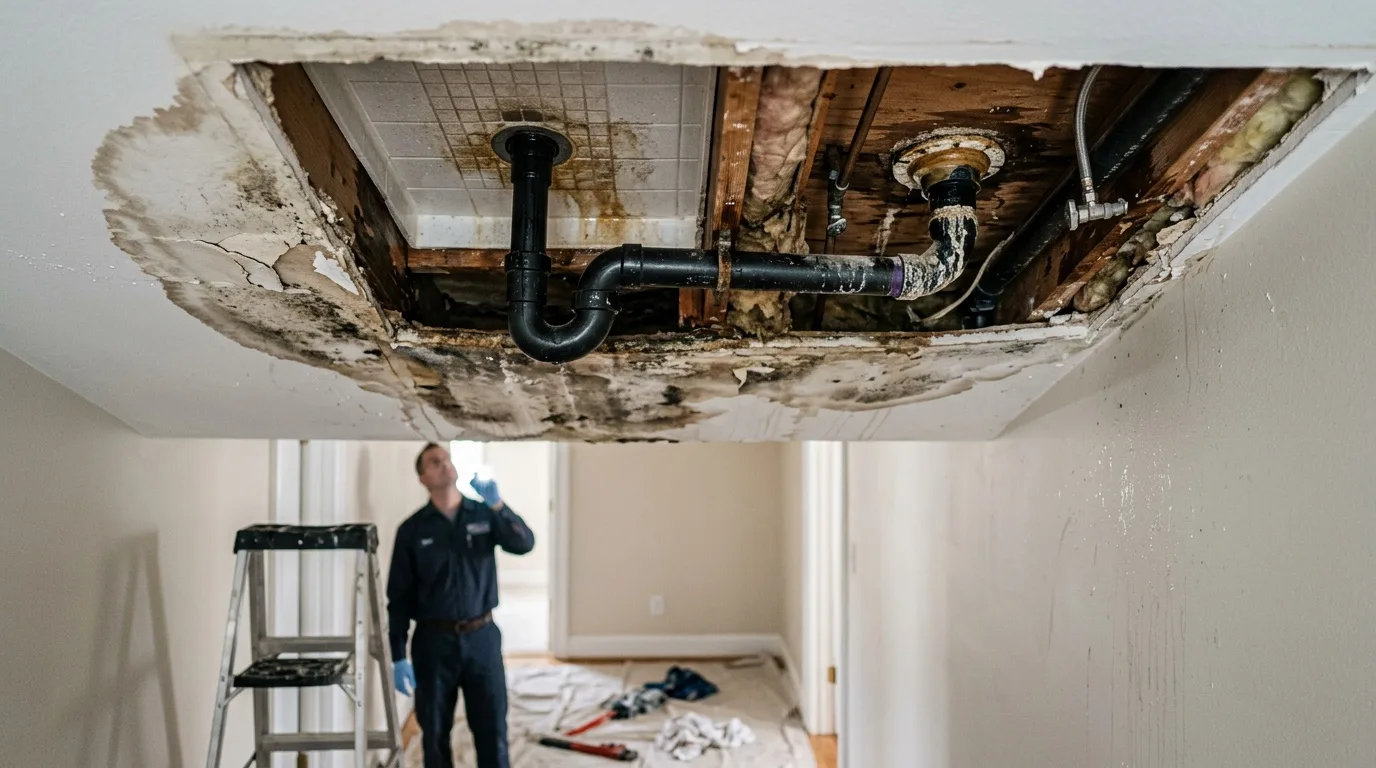
A leak in the ceiling under a bathroom rarely starts in the middle of the floor. Water travels along the weak points: joints, corners, pipe penetrations, the drain area, the seam between the tub and the wall. That is, the places where water can find a tiny chance and turn it into a path. And that is usually the trap: from the outside everything looks sealed, but inside the assembly there is a gap, a void or a spot that was never bonded.
Below we go through where the water comes from - the shower pan, the drain or the toilet - how to check each one, and what to do with the wet ceiling afterwards. For the bigger picture, see our page on water damage restoration in Carlsbad.
Finding the Source: When Does It Drip?
Pin down the cause first, then fix. The timing of the drips below tells you a lot.
- Drips after a shower. Look at the shower stall, the pan and the drain. The weak spots here are the joints between the pan and the walls, the shower door seals, and the drain and the space under the pan.
- Drips after a flush. Look at the toilet: the wax ring that seals it to the drain flange, the gasket between the tank and the bowl, the tank bolts.
- Drips all the time. Water is coming even when nobody uses the bathroom. Suspect the supply hose and its connections, or the plumbing hidden in the wall and floor.
Water from a shower leaking through the ceiling or a bathtub leaking through the ceiling does not always mean an obvious breakdown. More often the cause is wear of parts or installation mistakes.
Shower Leaking Through the Ceiling: Pan, Seals and Drain
The main causes are these:
- Worn seals. Rubber parts lose elasticity over time, crack and stop fitting tightly.
- Failing caulk. Under moisture and household cleaners, silicone peels away and leaves gaps.
- Installation mistakes. Wrong installation, a skewed assembly or weak fastening of the joints lead to leaks some time later.
- Physical damage. For example, hairline cracks in the pan or walls that you don't notice and that slowly become the source of a leak.
Joints are one of the most common reasons water ends up on the floor. Moisture sits there constantly, so defects show up fast: worn or damaged seals, a door that no longer closes tight, broken caulk along the seams.
The Shower Pan and How It Was Set
The pan plays the key role in holding water. If it was set wrong or is damaged, the problems usually are: the pan deforms or sags, there is no proper slope. A pan that is off level leaves water standing, and that speeds up the wear of the caulk and the joints.
Shower areas where the slope to the drain was done carelessly, "by eye," are especially vulnerable. Water lingers, stands in puddles, gets into the joints. Then the moisture does its work: somewhere the grout turns dark, somewhere the silicone comes off, somewhere fungus appears. And the person thinks the problem is the tile. But the problem was there before the tile, at the stage of the hidden work.
Waterproofing Under the Tile
If good waterproofing was not done during installation, water can get under the tile and into the walls. That leads to damage of the membrane layer, cracks in the corners and at the joints, and unsealed spots around pipes. Over time this means not just a leak in the ceiling below the shower, but also mold and ruined finishes.
Tile on its own is not waterproofing. On a job you can check it simply. The waterproofing should go up the walls to a reasonable height in the wet zone. The corners should be reinforced with tape, and pipe penetrations with collars or careful sealing, not "smeared around with a finger." The membrane should be continuous, without skips, without "gaps" in the corners. And there should be two coats, not "one thick one." One thick coat often cracks as it dries.
- Corners and joints reinforced with tape, not "silicone by eye."
- Pipe penetrations done with collars or as a system, with no holes or skips.
- Two coats with proper drying between them, not one "fat" one.
- The shower zone treated as a wet zone: higher, more carefully, neater.
Toilet Leaking Through the Ceiling
A leaking toilet is one of the most common problems in a home. Most often it comes from worn flush parts, rubber gaskets that deform and harden, or a badly adjusted float or flush valve.
Worn Gaskets and Seals
Rubber parts are the weakest link of the design. The gasket between the tank and the bowl wears out. The rubber cracks, loses elasticity, and a leak appears at the joint. The tank bolts have rubber washers - when they are damaged, water seeps from under the tank onto the floor. If the toilet leaks from the bottom at the base, the cause is most often the seal between the toilet and the floor or a leak in the outlet connection.
The Outlet Connection and the Supply Hose
The wax ring seals the toilet outlet to the drain flange in the floor. Over time it gets compressed, especially if the toilet rocks or was reset. A broken seal leads to leaks on flush - water shows up on the floor next to the toilet. But often the problem spot is a cracked or loose flange under the ring, which lets water through.
The supply hose can loosen where it is attached or get damaged. If it leaks where it connects to the tank or the shutoff valve, the problem is the hose gaskets or connections that are not tight enough (or, the other way around, overtightened). If water comes from under the toilet when you flush, also check the joint between the outlet and the sewer pipe.
Condensation Is Not a Leak
Very often, ordinary condensation passes for a leak. It usually collects on the tank and then runs down, so it looks like a leak. Wipe the tank with a dry cloth and just watch it for a while. If the problem is condensation, check the bathroom ventilation.
Tests You Can Do Yourself
Don't rush to take everything apart - find the source first.
- The shower check. Wipe the shower stall dry. Turn on the water and watch where moisture appears. Check the joints, the doors and the pan one by one. This way you can narrow the problem down and see whether repair is needed.
- The toilet base check. Run your hand under the tank where it is bolted on. If the bolts are wet, the problem is the bolt gaskets. Moisture on the floor by the base points to the outlet connection, the toilet seal or condensation.
- The food coloring test. Per the EPA WaterSense leak-check guide, put a few drops of food coloring in the toilet tank; if color shows in the bowl within 10 minutes, the flapper is leaking. Also check the floor around the base - colored spots point to an outside leak from under the toilet.
- The water meter test. EPA WaterSense also suggests reading the water meter before and after a 2-hour period when no water is used. Any change suggests a leak - including one hidden in the walls or floor.
A Toilet Overflow Is Contaminated Water
When the toilet overflowed and leaked through the ceiling, what came down is not clean water. Treat the wet ceiling, the insulation above it and everything the water touched below as contaminated. Wear gloves, don't let children or pets near the area, and photograph and video the damage in detail before cleanup, so the extent and the area are clear.
Water from a toilet overflow can carry sewage. Wet drywall, insulation and carpet it soaked are not something to just dry and leave in place - they need to be removed and the area disinfected.
Repair: When to Call a Pro
Not every fault can be fixed on your own. In some cases professional help is needed:
- The pan is damaged.
- The waterproofing has failed.
- There are serious installation mistakes.
- The leak is in hidden connections.
When the source is fixed, the damage below still has to be handled. If you want to know who will be doing that work in your home, read about our Carlsbad restoration team or what homeowners say in their reviews.
Drying or Replacing the Ceiling
Yellow stains can come from a slow hidden leak as well as from a flood. It is important to notice the drips in time, fix the problem, wait until the ceiling dries out completely, and only then start cleaning.
Painted Ceiling
Chlorine bleach can take yellow water stains off a painted ceiling. Put on rubber gloves and eye protection and keep the room aired out before working with it. Mix 1 cup of bleach and 3 cups of water in a bucket (never with ammonia or other cleaners; if the stain is big, make more, keeping the proportions). Dip a sponge in the solution and go over the stain, soaking it well. Wait 30-40 minutes, then take another sponge dampened with clean water and wipe off the bleach mix. Finally blot the area with a clean cloth or paper towel.
Drywall
Here bleach and other liquids won't work if water has not only stained the drywall but also sagged or softened it. There is only one way out - replace the damaged section.
Drying the Room
To dry the area:
- Air it out well. In warm weather a cross-draft is enough; in cooler weather it is better to run the bathroom exhaust fan and set up a strong fan.
- Use dehumidifiers. If the humidity in the room stays high, they lower it quickly and keep fungus from developing.
If the furniture and belongings in the room below have to come out while the ceiling is opened and dried, see our guide on protecting valuables during home restoration and our pack-out and contents storage services.
Mold After a Leak From an Upstairs Bathroom
Not all consequences of water damage from an upstairs bathroom show up right away. Fungus and mold appear only after a while. Whether mold appears depends not only on the leak itself but also on the quality of the building materials, the insulation of the walls and the ventilation in the room. In some cases mold is found not only in the leak zone but also in other places that seemed undamaged.
Fungal organisms are always present indoors, coming in from outside or through ventilation. But they start multiplying actively only under certain conditions - first of all, warmth and high humidity, plus poor ventilation. The rate can be very high: in a few weeks or even days, dampness can cover a large area with mold. It gets worse because you often can't see it at first - it can grow behind baseboards, wallpaper or above the ceiling.
Disinfection
When choosing antiseptics, it is better to go with specialized antifungal products rather than home remedies. Vinegar, baking soda or chlorine bleach may kill the top layer of mold, but not the source. When the growth is large, over a big area, it is better to turn to professionals, because getting rid of the organisms completely on your own is very hard - see our mold remediation services in Carlsbad. Keep records of all expenses related to removing the mold: contracts, receipts, invoices and other documents.
More articles on leaks, drying and mold are on our water damage blog, and the full list of services is on the Carlsbad restoration company home page.